How 3D Printer Layer Height Impacts Print Quality
When fine-tuning print quality, layer height is one of the most important settings to consider. It directly impacts surface finish, strength, and print speed, influencing everything from detailed miniatures to functional prototypes.
Choosing the right layer height balances precision, durability, and efficiency. Understanding how this setting affects print performance will help optimize your results with your printers.

What is 3D Printer Layer Height?
Layer height refers to the thickness of each individual layer in a 3D print. Measured in millimeters, this setting determines the level of detail your printer can achieve and influences overall print performance.
A lower layer height results in finer details and smoother surfaces but increases print time. A higher layer height prints faster but with more visible layer lines. The right choice depends on your print's intended use, size, and detail requirements.
The table below outlines how different layer heights impact print quality and speed.
|
Layer Height (mm) |
Print Quality |
Print Speed |
Best Use Case |
|
0.05 - 0.1mm |
Ultra-fine details, smooth finish |
Slow |
Miniatures, intricate designs, high-detail models |
|
0.15 - 0.2mm |
Balanced quality and speed |
Moderate |
General-purpose prints, functional parts |
|
0.25 - 0.3mm |
Faster prints with visible layers |
Fast |
Large models, durable prints |
|
0.35mm+ |
Rougher layers, fastest speed |
Very Fast |
Draft prints, rapid prototyping |
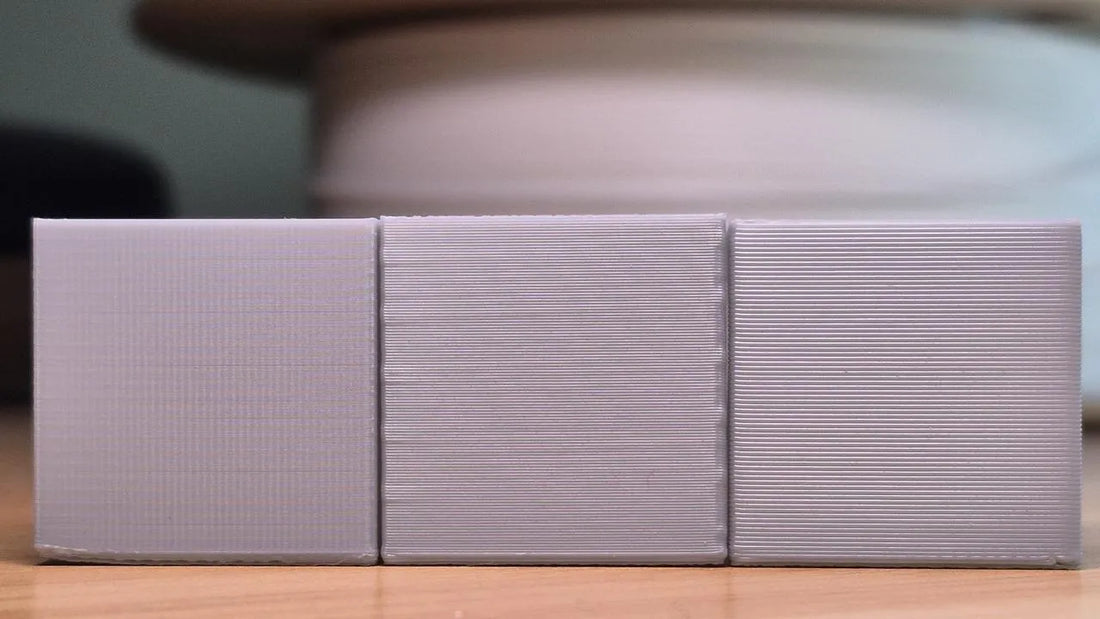
For example, the following three cubes were printed at layer heights of 0.1mm,0.2mm, and 0.3mm using a 0.4mm nozzle. Notice how the layer lines are almost impersevable on the smaller layer heights.

As stated above, though smaller layer heights can vastly increase print times, this print in vase mode for a 25mm cube at 0.3 took 6 minutes, at 0.2 took 9 minutes, and at 0.1 took 18 minutes
How Layer Height Affects Print Quality
Layer height affects print quality in three main areas: surface finish, strength, and speed. Let's look at each in more detail:
Surface Finish
Layer height plays a significant role in determining the surface finish of a printed model. A lower layer height reduces the visibility of layer lines, resulting in a smoother appearance. This is particularly useful for aesthetic prints where a refined finish is desired.
In contrast, a higher layer height makes the layers more noticeable, giving the print a textured look. While this may not be a concern for mechanical parts or quick prototypes, it is something to consider when printing objects that require a polished finish.
Print Strength
Print strength is also influenced by layer height. Lower layer heights generally improve adhesion between layers, enhancing overall durability. However, if strength is the primary concern, thicker layers provide more structural rigidity, making them well-suited for mechanical or load-bearing parts. The choice of layer height should depend on whether surface quality or structural strength is the priority.
Print Speed
Another key factor to consider is print speed. Lower layer heights result in more layers per print, increasing overall printing time. This is necessary for achieving fine details but may not be practical for large-scale models or functional parts.
Higher layer heights reduce print time significantly, making them an excellent choice for prototyping or larger projects where precision is not the main focus. Finding the right balance between quality and efficiency is crucial for optimizing printing.
Choosing the Best Layer Height for Your Project
The ideal layer height depends on the specific requirements of your project.
For prints that require fine details, such as miniatures or decorative models, a layer height of 0.1mm or lower is recommended to achieve smooth surfaces and crisp details.
A layer height of 0.15mm to 0.2mm balances quality and speed for general-purpose prints, making it the best choice for functional parts and everyday models.
When printing large or strong objects, a layer height of 0.25mm to 0.3mm helps speed up production while maintaining good durability.
If the goal is rapid prototyping, a layer height of 0.35mm or higher allows for significantly faster prints, which is helpful for testing designs before committing to a final version.
Optimizing Layer Height with eufyMake Studio
Selecting the right layer height is only part of the equation. One of the most important factors to consider is the relationship between layer height and nozzle size.
A good rule of thumb is to set the layer height between 25% and 75% of the nozzle diameter.
For example, with a standard 0.4mm nozzle, the recommended range is 0.1mm to 0.3mm. Staying within this range ensures optimal print quality while preventing under-extrusion or poor adhesion.
Adjusting Print Speed and Temperature
In addition to adjusting layer height, print speed and temperature settings should be taken into account. Lower layer heights may require a slightly higher nozzle temperature to improve adhesion between layers, as thinner layers cool more quickly.
Conversely, it may be beneficial to reduce the print speed slightly to maintain accuracy and prevent quality issues when printing with higher layer heights.
Considering Filament Materials
The choice of filament material can also impact how layer height affects a print. PLA prints well across all layer heights, making it a versatile option for various applications.
PETG benefits from slightly higher layer heights, typically 0.2mm or more, to reduce issues like stringing and oozing. ABS, which requires strong layer adhesion, performs best with medium layer heights between 0.15mm and 0.2mm, combined with a heated bed to prevent warping.
Considering these material properties when selecting a layer height will help improve the quality and reliability of your prints.
Using Variable Layer Heights for the Best of Both Worlds
While selecting a fixed layer height works well for many prints, slicing software has an amazing function called Variable Layer height. Variable layer height can optimize both quality and speed within the same print.
This technique automatically adjusts layer height based on the model's geometry, using smaller layers in areas that require fine detail and thicker layers where precision is less critical.

Variable layer height is particularly useful for models with curved or sloped surfaces, where finer layers can produce smoother transitions. At the same time, areas with little detail, such as the base of a print, can use thicker layers to reduce print time. This approach provides a balance between fine detail and efficiency, making it ideal for prints that require both precision in certain areas and overall faster production.
eufyMake Studio makes it easy to implement variable layer heights. The slicer automatically calculates where layer adjustments should be applied, ensuring optimal results without requiring manual tweaking.

Selecting the right layer height is essential for balancing print quality, strength, and speed. Whether you need ultra-fine details or a quick prototype, understanding how to adjust this setting ensures the best results with your AnkerMake printer.
Experimenting with different layer heights in eufyMake Studio allows you to fine-tune your settings and optimize your prints for any application. Whether creating highly detailed models or focusing on efficient production, choosing the right layer height will help you achieve high-quality results every time.