How to Print Custom Stickers at Home: Step-by-Step Guide
Making your own stickers at home can be rewarding.
But common methods often have problems.
Printable vinyl and inkjet sticker paper tend to fade, tear, or peel over time. This is more likely if the stickers get wet or are often exposed to sunlight. These issues can become a problem when selling products or making high-quality designs.
Now, there is a better way. UV DTF printing lets you make custom stickers at home. These stickers look professional and last much longer. You do not need a separate cutting machine.
This guide will teach you how to master the whole process.
What You'll Need to Get Started
To begin making stickers at home, you need a few basic tools.
Here's what we used in this guide:
- UV DTF sticker printer
- UV DTF A film and B film
- UV DTF Laminating Machine
- UV ink
- Your design (image or vector file)
- A soft scraper or squeegee for pressing
Ready to see how it's done? Let's walk through the process step by step.
If you're the kind of person who prefers watching over reading, check out this video.
Step 1: Prepare Your Sticker Design
It all starts on your computer. Open the eufyMake Studio software and import your design files.
We recommend using PNG files as they work best with transparency and provide clean edges.
Next, you need to set a few important options.
For vibrant colors, you should set the print quality. The easiest way to do this is to select the integrated " Sticker" preset. This will take care of all the technical settings for you, including the layers of white ink and varnish.
If you are printing a batch of stickers, you can use the Global Ink mode to apply these settings to all designs at once, saving you a lot of time.
We often use this method when creating multiple sticker designs at once. For example, a set of plant graphics or custom logos.

Step 2: Set Up Film A on the Printer Bed
With your design ready, it's time to set up the printer.
Place a sheet of Film A onto the mini print bed.
This film has a light adhesive backing to hold it in place; leave this on for now.
There is also a clear protective layer on top. It should remain in place to prevent dust or fingerprints until you are ready to print.
While you're at it, plug in the laminator and press the heating button. This will ensure it's fully warmed up and ready to go later.

Step 3: Align and Preview Your Designs
Go back to the software and click the Snapshot button. This is a smart feature built into the E1 workflow. It does two things at once:
-
It scans the height of the Film A to focus the print head.
-
It activates a live camera feed of the print bed, showing exactly where your material sits.
With the live preview, you can drag, resize, and position each sticker precisely. If you're working on a detailed layout or multiple designs, this tool makes alignment quick and accurate.
You can even run Snapshot right after placing Film A. While it's scanning, you can still import designs and set up the print, which saves a few minutes.

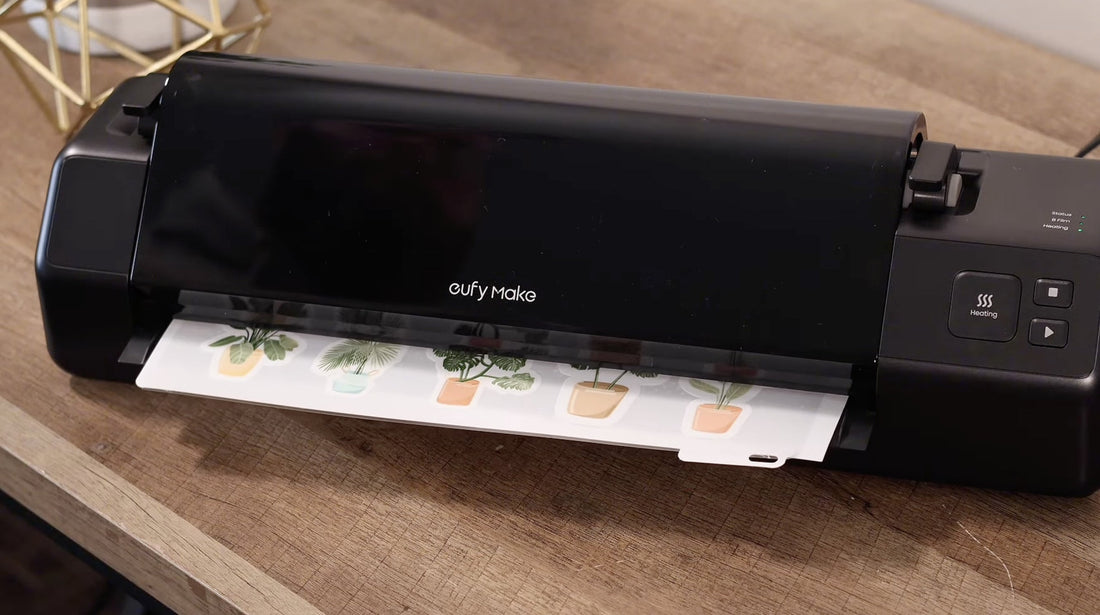
Step 4: Print Your Stickers
Once everything is in place, it's time to print. Peel off the top film from Film A right before starting. This keeps the surface clean until the last second.
Then close the printer's doors-both front and back. Doing this creates a controlled environment that blocks dust and improves print quality.
Now press Start. The printer will begin laying down UV ink in full detail, including white and varnish layers. If you're printing multiple designs, they'll all print in one run.

Step 5: Laminate the Printed Film
After the print finishes, remove the mini print bed to give yourself more room. Gently peel Film A from the bed.
Now it's time to add Film B, which carries the adhesive.
Place Film A and Film B together on the carrier card, with Film B on top. Feed this sandwich into the laminator. The preheated rollers will automatically pull the sheet through and bond the layers.
The laminator has a built-in cutter. Slide the blade across the back of the machine for a clean finish-no scissors needed.
At this point, your sticker sheet is ready. You can cut them out individually and start applying them to jars, laptops, mugs, or packaging.

Applying and Using Your Custom Stickers
Your finished stickers are fully waterproof and scratch-resistant. They bond well to glass, plastic, and metal surfaces.
If you're applying them to a glass mug or jar, take a little extra time to line up the sticker perfectly before it touches the surface. The adhesive is strong and bonds almost instantly.
These stickers hold up well over time, making them a great option for:
- Personalizing water bottles and laptops
- Creating custom phone case designs
- Branding your product packaging
- Making handmade gifts for holidays or events
We've tested these stickers on multiple surfaces, and they stay in place even with daily use and washing.
This part is a little bit tricky, we've include more details process with picture about how to make uv dtf transfers.
{{ component: "product", handle: "eufymake-uv-dtf-laminating-machine", sku: "V8270110"}}
How to Make Raised Stickers for a Premium Feel
If you want your custom stickers to look more high-end, the E1 can print raised designs with a 3D texture.
In the eufyMake Studio software, switch from the Sticker preset to the Raised Flat preset. This setting builds up extra layers of ink for a tactile finish.
For stickers on jars or mugs, we recommend setting the height between 0.25 mm and 0.5 mm. A height of 0.3 mm gives a great feel without making the sticker too rigid.
You can preview the raised effect in the software before printing. Once you're happy, follow the same printing and lamination steps as a flat sticker.
Raised stickers work especially well on flatter surfaces like jars, tumblers, and phone cases. They feel more premium and stand out more than flat prints. But remember that the thicker the sticker, the less flexible it will be.

Best Printer for UV DTF Stickers
If you're looking for a easy-to-use UV DTF sticker printer, the eufyMake E1 is one of the best options.
It prints directly to film, so you don’t need a cutting machine or extra tools.
The E1 comes with smart preview features that show exactly where your stickers will land on the film. This helps avoid alignment mistakes and wasted material. You can print a full batch of stickers in one run, complete with white ink and varnish layers.
Even with all these features, the E1 remains affordable and easy to set up.
{{ component: "product", handle: "eufymake-e1", sku: "BUNDLE-V8260J40-1-V7240010-1"}}
Final Thoughts
You don't need a print shop to make high-quality custom stickers. With the eufyMake E1 and a few simple tools, you can handle the whole process at home.
From design to application, the steps are clear, repeatable, and reliable. Whether for personal use or a small business, this method is cost-effective and high-quality.
FAQs about Sticker Printing
Can I print stickers with a regular printer?
Yes, you can use a regular inkjet or laser printer with compatible sticker paper. The stickers will look good but usually won't be waterproof or very durable. These are fine for indoor or decorative uses. For tougher stickers, you need special printers or extra steps like lamination.
What is the best format to print stickers?
PNG is often the best format if you need a transparent background and clean edges. PDF and SVG also work well, especially for designs that need to stay sharp. Make sure your image is high resolution so it prints clearly.
What is the difference between UV DTF and vinyl stickers?
UV DTF stickers differ from vinyl stickers in that they are printed on a film and transferred directly to the surface without cutting. They work more like decals, making them faster to produce, waterproof, and highly durable.
Vinyl stickers are printed on adhesive vinyl, require cutting, and sometimes need lamination.
While they are flexible and come in various finishes, they tend to be less detailed and less durable than UV DTF stickers.
How do you remove a UV DTF sticker?
To remove a UV DTF sticker, heat it gently with a hair dryer to soften the adhesive, then peel it off slowly. Any leftover residue can be cleaned with rubbing alcohol or adhesive remover. The stronger the adhesive bond, the more time and care you may need for removal.
Are UV DTF stickers dishwasher safe?
Results may vary. Some users have put UV DTF stickers on mugs and run them through the dishwasher without problems. But for best results and long-lasting color, we recommend hand washing only. That way, the sticker stays looking new for longer.